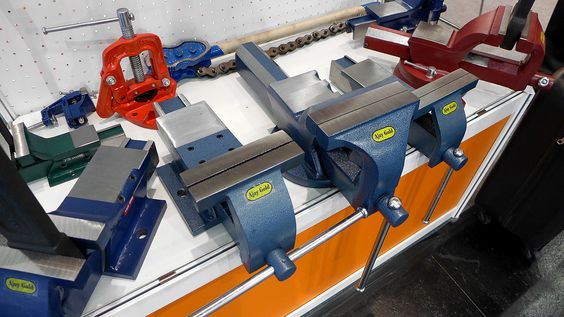
 The vise is a tool also known as a vice, and is very useful for clamping cut parts that are often difficult to hold. These pieces can be of different sizes and shapes, and thanks to the spindle with jaws, which can be lined with softer materials such as rubber, aluminum lead, plastic or rubber (for carpentry), deformation or damage to the piece is avoided. it holds. The main characteristic of a tool like the vise is that it can fix two pieces in all the desired positions with great ease and force, being a key piece in any professional or amateur work warehouse. As there are a great variety of bench vices depending on the use to which they are intended, and as the correct choice of this tool will determine both the effectiveness and the comfort with which we are going to carry out the work, we are going to detail the main vices that exist . If you want to access our vise catalog, click here. Bench vise: Differentiation of types according to their functionDepending on the use to which the vices are intended, we will find the following uses:
Now that you know the classification of walruses or vices according to the use that we are going to give them, you should know that we can also distinguish them according to the fastening method. Depending on the manufacturer, these walruses are offered in three models, combined or not. While fixed base walruses are the most common and economical and are available in a wide variety of sizes, we also find swivel base walruses: this base allows the clamp to be moved at an angle of 180º for an optimal working position. The vise with anvil, for its part, is attached to the fixed jaw (that is, to the back) of the tool, and is extremely useful for light hammering operations that seek to flatten and / or give the appropriate shape to the piece. Safety rules for using the viseWe mainly distinguish 4 very basic safety rules, but which we must apply perfectly if we want to obtain the optimal performance of our tool as well as work free of all risks:
By following these usage tips, and thanks to the small guide to know all the types of vise that are on the hand tools manufacturer, we are sure that you will get the best performance from this tool.
0 Comments
Know which spanners use and great tips on how to properly use them. Know how to use different types of clamps and clamps, including flexible clamps, pipe or silk clamps; socket settings and basin locks. You will also see what is common to any portion of the wrench or spanner. For a number of applications, there are several types of spanners and wrenches. A lock or brace is used to fix a nut, bolt or a similar fixing. The spanners is used to hold the specified attachment and turn it so that the torque is applied and the nut is tightened. Types of spanner and wrench A collection of such spanners are typically cheap, but are very useful and must be placed in all tool boxes. Socket Set A connector kit is an ideal way to provide a range of instruments to work with nozzles and bolts. They are a perfect substitute for a clamping package and are compacter and simpler to transport. They appear to be a little bit more costly and often difficult to use in challenging areas. Adjustable Spanners You can use adjustable spanners for a wide range of screws and bolts so that a wide range of different size clamps is not needed. The problem is that they can be difficult to use because they do not secure the neck or bolt tightly. Ratchet Spanners Ratchet spanners are spanners that save a lot of work but cost a little more. In the DIY sheds and motor stores there will always be a place for the ratchet clamp, which helps you to cut a nut, without taking the clamp off, some sort of combination of a lock, socket and truck.
Providing proper maintenance to our Hand manufacturer tools guarantees a longer useful life as well as efficient and safe operation. Today we explain everything about carpentry tool care. Space Set aside a space for your tools. Place them preferably hanging. This way you locate them more easily and prevent them from being damaged when rubbing against each other. Hammers and Mallets These instruments need your head to be firmly attached to the handle. To further secure your hammer, you can insert a metal wedge into the end of the handle. In this way the head is fixed firmly. Apply linseed oil to prevent cracking due to the dryness of the wood. It is important not to neglect the metal parts of our hammers. Apply a light coating of grease to the hammer heads regularly. If the shell is scratched, fix it with medium-grit sandpaper. Measuring tools Store them in a dry place to protect them from moisture. If they have metal parts, grease them regularly. Apply linseed oil to its wooden parts to protect them from stains. Spatulas Clean the plaster or glue residue with the help of a hot air gun. It will melt the material and it will be easier to remove it. Saws Protecting the blades of our saws is of vital importance to avoid injuring ourselves or damaging them. Use pods or rubber bands to cover them. Rust is the worst enemy of our mountains. It is that reddish trace that forms on its leaves due to oxidation. Protect them from rust by covering them with paraffin or petroleum jelly. It is important to apply fine oil regularly to prevent it. Painting tools Brushes and brushes should be washed after use. Remove the paint residue with warm water with a little soap. If the paint is oil-based, use white spirit. Then wash them with soap and water. Finally, let it dry.
Extend the life of your woodworking tools by maintaining them properly. |
Archives
August 2023
Categories |
 RSS Feed
